Saturday, December 31, 2016

December 30 Stampfest with Lynette

Lynette and I decided to start some art journal pages with my new Dina Wakley Heavy Body Acrylic Paints. I grabbed my previously gesso-ed papers and my new journal. It's a Canson 5.5 x 8.5 inch size with 138 lb paper. I don't know the details on the loose papers which were from my stash.
Before getting started we watched some YouTubes:
and
Then we had a ball playing with paint, stencils, stabilio pencil, the fine tip applicator to write with Dina's paints

Made by Lynette
Made by Lynette

This and the next photo show my attempts. You can always click on an image to enlarge.

It has been very fun and relaxing to try to draw lady faces like Dina Wakley and Jane Davenport.
Inspired by page 77 of Jane's book, Drawing and Painting Beautiful Faces: A Mixed-Media Portrait Workshop, I cut out an oval and tried to draw a face with my India Ink Pitt 0.1mm extra fine pen. I used Golden gel medium-Soft Gel (Semi-Gloss) to adhere it to the page and also added the gel over the oval. It dried quickly and ended up with a nice semi-gloss finish that was not too shiny. On the left panel, I drew the face with a stabilio pencil. Noticed that the pencil bled when I tried to add some watered down Lapiz blue paint. So I added some white from a white out pen to "fix" the eye. I'm not sure I liked how the stabilio pencil got bled, so will have to experiment with it. I really like Dina's attitude...about just making art and not worrying! Just love her words, "Oops, oh well". She gives everyone permission to have fun with art!

Here is a photo of Lynette and me--
a nice remembrance our our fun exercise in art journaling with paints!

Materials:
Dina Wakley Heavy Body Acrylic Paint
Fine Tip Applicator for writing words in black paint
Stabilio pencil
Faber-Castell India Ink pen
Dina Wakley Word Stencil-"Hey You"
Sequin waste stencil
Flat paint brushes
Toothbrush

Saturday, December 24, 2016

Christmas Cards 2016

Merry Christmas and Happy Holidays to all my friends, near and far!
Made a few Holmade Christmas cards this year...and at the last minute.
Though busy, it sure was relaxing going into a zone
while playing with papers, inks and stamps!

My friend, Lynette, found this SU set, City of David at a garage sale for me!
Thanks so much for being my personal shopper, Lynette!
In addition, she found this card on pinterest for inspiration
which directs to Peggy Murwin's card on her Stamp with Peggy blog.
The dry embossed background was made from the embossing folder
in the Tim Holtz Bird Talk 2 clear stamp set by Sizzix.

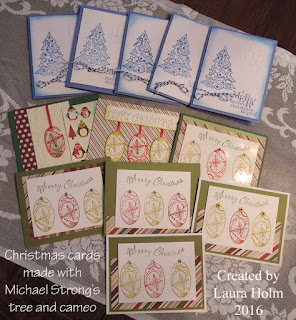
Combined a dry embossed snowflake by Sizzix, Tim Holtz with Michael Strong's Cloisonne Christmas tree, a Penny Black sentiment and some twine on these.

Used Michael Strong's Cloisonne Cameo-snowflake, a SU sentiment, printed papers, ribbon and a cuttlebug snowflake dry embossing here.

Variations on a theme...adding eyelets to the Michael Strong Cameo

A closer view

Inks used
Stampin' Up! ballet blue
Versamark black onyx
distress festive berries, crushed olive & peeled paint

Thanks for visiting!

Saturday, December 17, 2016

Dry Embossed Card Set with Case

I made a set of note cards as a hostess gift for our neighbor last week.
The fronts of the card are dry embossed using Cuttlebug snowflakes
and a Sizzix embossing folder (which Sizzix calls "texture fades").
I wish there was a name on the Sizzix folder.
It came as part of a Tim Holtz Bird Talk 2 clear stamp set.
The card case is made with a simple paper folder.
A few more details for making the case are HERE.

I added a JustRite monogram to some of the cards.
Used scallop punches and layered with black paper.

Decided to keep some cards plain and simple--just the embossed front.
Hope my friend likes them.

My case is made with a paper school folder
with the 2 embossed layers and the monogram attached to the front.
Cards and envelopes go inside the pockets.
Fold down and trim.
For the ties, punch a hole on the side, insert ribbon and knot on the inside.
Tie a bow to close the case.

Thanks so much for visiting!

Saturday, December 10, 2016

Bird Talk Tag and Card

Just love these little birdies from Tim Holtz' Bird Talk clear stamp set.
My friend, Lynette, let me stamp up some on old book paper when I was at her house awhile ago.
Used her colored pencils to color them. Then they sat on my stamping table for a long time.

I found a partially made tag in my stash and used this birdie on it.
Using a recycled a coffee cup liner/wrapper, I cut my own little branch.
For the sky, I cut a my own cloud template, then sponged with distress broken china.

Here is a light purple card using another one of  Tim Holtz' Bird Talk Birds.
On each side of a white layer, I dry embossed a zig zag design
using Patterns & Stitches, a long narrow embossing folder by Tim Holtz/Sizzix.
Sponged with distress seedless preserves.
Created the same type of branch as in tag, added twine fibers and another Bird Talk birdie.
The sentiment is by Wendy Vecchi, A Form of Art-LCS048.
Thanks for visiting!

Saturday, December 3, 2016

Island Wedding Card

Made this wedding card for a couple who were married in the US Virgin Islands a few weeks ago.
We will be going to a reception here on the mainland. We didn't attend the wedding.

My wrinkle free distress background, reminded me of the ocean.
So I dry embossed it with the Tide embossing folder to add some "waves".
I wrote the bride and groom's names in black marker on a scalloped heart
and stamped the sentiment on an oval layer.
Cut a strip of tulle and made a bow.

Here is the inside of the card

Stamps
PSX F2278
Hero Arts Clear Design Treasure the Moments

Inks:
Distress salty ocean, scattered straw
Stampin' Up bliss blue
Versafine black onyx

Tide Lifestyle Crafts embossing folder-Waves EF0020
Fiskars border punch

Thanks so much for visiting!

Wednesday, November 30, 2016

Friendship Cards on Wrinkle Free Distress Backgrounds

Here are cards made with some wrinkle free distress pieces 

I have been wanting to use my new friendship stamp called Heart of Friendship by Stampendous.
I thought a collage-y card would look nice on the background with this sentiment.
If you know me, you know how I love the collage-y look.

Here's a closer look. You can always click on the image for a larger view.

Used a "ribbon like" mesh as a stencil, sponging with mowed lawn.
Used picket fence stain on a Rays stamp from Stampers Anonymous Bitty Grunge CMS087 
in the upper left corner but this did not show up well. So, I dried it with heat tool 
and stamped over it with Frost White Color Box pigment ink.
Hard to see in the photo.
Stampendous Heart of Friendship  stamped in peacock feathers
Michael Strong's mini cloisonne heart in broken china.
Used fossiliaed amber for:
Stampin' Up's postage stamps from Travel Post
Stampin' Up's key from Antique Collectibles
Stampin' Up's ledger script from Office Ephemera.
Used distress tool on edges and sponged with broken china
Added fun fur yarn and attached to white card
in which the edges were sponged in broken china.

The distress background piece for this card was a little small
so I added a black layer underneath, trimming the border with a Fiskars border punch-Rope.
Used the "ribbon mesh" stencil sponging with mowed lawn.
Stamped Rays stamp from Stampers Anonymous Bitty Grunge CMS087
in Frost White Color Box pigment ink in center.
Stamped both the 
Stampendous Heart of Friendship
and
Michael Strong's mini cloisonne heart
in mowed lawn.
Used fossilized amber for:
Stampin' Up's cancelled postage stamp & ledger script from Office Ephemera
Stampin' Up's hotel oval from  Travel Post.
Used distress tool on edges and sponged with mowed lawn.
Added fun fur yarn and attached to green card.

Thanks so much for visiting!

Tuesday, November 29, 2016

Kraft Wedding Card

Made this wedding card for a very dear couple whose wedding was Nov. 19.
I chose kraft cardstock because the wedding invitation was on kraft paper!

For stamping I used my Just Rite monogram set and a PSX sentiment stamp.
For dry embossing I used Cuttlebug Heart Blocks and Textile embossing folders.

On the inside I used a favorite Hero Arts Clear design set called 
Treasure The Moments-Cl156
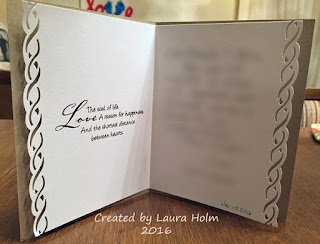
Used a Fiscars border punch-Rope on each side.

Thanks for visiting!

Sunday, November 27, 2016

Anniversary Card

Here is an anniversary card that I made using wrinkle free distress technique.
It's so easy and fun!
Since I had used a previously made background, I'm not positive about the inkpad colors.
I think they were
peacock feathers, mowed lawn and scattered straw
 tapped directly on craft sheet, next to each other. 
Spritzed with a fine mist of water till the color beaded up
then placed paper directly on top, moving the paper just a little.
You can see my wrinkle free distress tutorial here.
I learned from Tim Holtz' wrinkle free distress technique
described here and here.
I usually use Georgia Pacific 110 pound paper, 92 bright.
You can experiment on other papers.
I like to run more than 1 piece of paper through the "color" on the craft sheet.
Then I have extras for quick cards.
I usually let my paper air dry, but you can use a heat tool also.

Stamps and inks used:
Hero Arts Harelquin Pattern Block G3316 in peacock feathers
Hero Arts Woodland Grasses F3182 in wild honey
Stampabilities Happy Anniversary DC CR1148 sentiment in Versafine black onyx
Michael Strong's mini hearts in mermaid lagoon, fussy cut and attached with foam tape.

Fun fur yarn added then the layer was attached to blue card stock.
I wrote in the names of my friends, Hetty & Raymond with my new favorite pen,
Faber-Castell PITT artist pen BLACK 199*** XS .01 nib

I also stamped Michael Strong's mini hearts inside.

Since I wasn't sure exactly which colors I used on the card, I made some samples for you.
Used distress ink pads: broken china, scattered straw and mowed lawn.

Used distress ink pads: mermaid lagoon, mowed lawn and fossilized amber.

Hope you have fun with wrinkle free distress technique!
Thanks for visiting!

Wednesday, November 23, 2016

Kid's Sweatpants

I made sweatpants for my 18 month old grandson, Gavin.
The last pair I made for him were too long, so I measured the pants he was wearing.
These were the measurements:
inseam  12-1/4 inches
outseam  17-3/4 inches

For these pants I used Angel Hickman Peterson’s Fleece Fun Easy Pants Pattern
 I used size 24 months, except that I cut them shorter, at the 18 month line.
Waist elastic-18" long by 3/4" wide.
Bottom leg elastic-7-3/4" long by 1/2" wide.
I straight stitched the casings for the waistline-1-1/2 inches turned over
and leg bottom-1 inch turned over.

Newborn Baby Gowns

I'm sewing baby gowns again! My daughter Emily is expecting a baby girl in January 2017. She liked the newborn gowns I made for Gavin. They are nice when changing baby in the middle of the night!
I used Rachel's Overlap Shoulder Newborn Gown pattern that she so generously shared on her blog, Stitched Together.


I used the Stretch n Sew "chanel trim" method for the neckline.


 I cut the 2 strips in Rachel's pattern a little wider, 1.75" wide (instead of the 1.5 inch).
Pinned the strip to the RIGHT side, folded it to the wrong side, 
pinned itthen "stitched in the ditch" from the RIGHT side
removing pins before sewing.
It is very easy and looks nice, I think.
 
Thanks again, to Rachel at Stitched Together for sharing her expertise and pattern for this quick and easy gown pattern!

You can see the gown I made for Baby Gavin here.

Saturday, November 12, 2016

Thanksgiving Pumpkin Harvest Cards

Hello friends! It has been a long time since I have posted! A lot has been going on with family, mostly with my dear father, who has had lots of health issues. He is doing pretty well right now considering his age-88 years.
My husband and I did manage to take a two week vacation out west, which was refreshing and wonderful!!!

I had not planned to make Thanksgiving cards today, but was inspired by my friend Hetty! Thanks so much! It was fun and relaxing to play with my paper and inks!

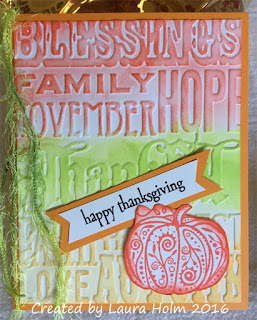
I decided to use bright colors...ripe persimmon, twisted citron and spiced marmalade, sponging them on the cool Tim Holtz/Sizzix Thankful texture fades (I always just call them embossing folders!). And I just had to use my Michael Strong's Pumpkin Harvest stamp set. Love how one of the pumpkins is a "Jackie Lantern" for Halloween, and the other two pumpkins can be used on fall cards. Here you see the small plain pumpkin. The Happy Thanksgiving sentiment is from Hero Arts. Used Versafine Black Onyx for the black stamping. Added green fun fur fibers from my stash.

After stamping Mike's pumpkin vine in distress twisted citron I colored in select areas with markers. I I don't have a vertical "happy thanksgiving" stamp, so I wrote it myself. Used dimensional foam to attach the pumpkins on the cards.

 
I used a marker to ink the "happy" and "thanksgiving" separately on this card because I didn't have enough space to stamp the whole sentiment.
 These 2 cards are unusual in the way the yellow layer of paper is adhered to the back of the front. It's easier to see what I'm describing if you look at the photo below.

Here is a picture of the inside of the card.
I attached the yellow layer with TomBow Mono multi-liquid glue adhesive. It does not seem to warp the paper as much as my other favorite glue, Scotch Quick Dry Tacky glue.
I wish I knew the name of this kind of layering in cardmaking. It's kind of nice because the inside right panel is white, all ready for stamping the sentiment and writing notes.
Thanks so much for visiting!

Wednesday, August 24, 2016

August 22 Stampfest at Lynette's

Lynette and I stamped together on Monday at her house.
She made a wonderful seafood pasta salad for lunch.
Then we made cards inspired by pinterest.
Lynette wanted to make some Scribbly bird cards
like the ones I made here
and I wanted to try her new Tim Holtz small crazy birds.
Note: click on image for larger view

We changed the stamps and colors. 
 Inks: SU tempting turquoise, limeade
Stamps: Balmy Breezes and unknown SU happy birthday 

we used several stamps to duplicate her pretty frame.
Lynette used watercolor crayons to ink the Hero Arts flower stamp
and used cut outs from the Natural Beauty word stamp by Stampin Up.
The top layer was fussy cut and attached with dimensional foam.

Lynette used my Dina Wakley Scribbly Bird cling stamp set making her cards like mine here.
Inks used for the wrinkle free distress backgrounds that Lynette created:
mermaid lagoon, crushed olive, peeled paint and squeezed lemonade.

I used Lynette's Tim Holtz Bird Talk clear stamp set that comes with 3 birds and matching dies, some word stamps and an embossing folder. This set was from Michaels. It seems that the sets vary depending on which store carries them.
We both used her Prismacolor pencils to color our birdies.


Lynette is working on card arrangement.

Thanks for visiting!

Sunday, August 21, 2016

Coloring and Painting Scribbly Birds

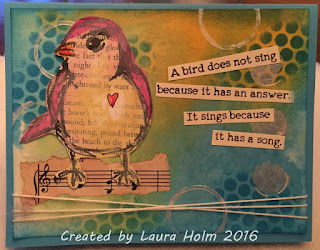
Here are some Scribbly Bird cards inspired by Anneke De Clerck's bird card blog post 
 
 I embellished wrinkle free distress backgrounds from my stash:
sponged mermaid lagoon ink over a Tim Holtz' Honeycomb stencil,
stamped Tim's Bitty Grunge stamp with stormy sky.
I made my own 3 circle stencil with cardstock and a  5/8 inch punch
applying pearlescent white Adirondak acrylic paint through the circles with a paintbrush.
 
For the open circles, I used Dina's technique-
dab some acrylic paint on the bottom of a paint bottle and apply it to your piece. 
I also found the open side of one of the screw tops of the dabbers worked even better.
It's a pity my Adirondak paint dabbers are drying out before I can use them up.
 
For the Scribbly bird above, I used card stock, 
stamped it with a BoBunny text stamp in pumice stone.
Then on top of that, I stamped Dina's bird on top, using Versafine black onyx ink. 
When dry I used colored pencils to add color.


 Here are some photos of my work along the way.

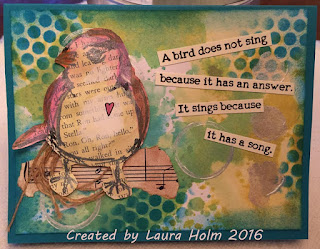
 I tried Dina's method of dry painting the Scribbly birds, 
which have been stamped on old book paper.
I used red colored pencil for the tiny heart. She used paint. 
Afterward I outlined the heart with a Pitt Artist Pen 0.1 mm-Black India Ink.
Below are the 3 painted Scribbly birds.


 I added the sentiment from the set on some of my cards
cutting out the lines and attaching with Golden Soft Gel (Semi-Gloss) gel medium.


I used various fibers from by stash.


 Pulled out some strands of burlap, making circles to resemble a nest.

Thanks for visiting!